Knowledge Base
GPTWeb: Getting Your First AI Response — Core Setup Guide
here's the thing about setting up GPTWeb — it doesn't feel like work. Most platforms make you earn it: hours of decision trees, integration config, template selection, and plugin hunting before you see a single thing work. GPTWeb flips that completely. You sign up, drop in an API key, upload one document, and within 30 minutes your site is having real, intelligent conversations about your business. Not a demo. Not a sandbox. Your actual live site, talking to real visitors.
The 'aha moment' hits fast — usually when you ask your new AI assistant a question about your own content and it answers it correctly, contextually, without you writing a single rule. From there, every step you take unlocks a new superpower: scoring, segmenting, automating, syncing to your CRM. But first things first — let's get you to that first AI response. Here's your focused, no-overwhelm guide to the core setup.
Phase 1: Account Setup (10 minutes)
| # | Step | Why | Where |
|---|---|---|---|
| 1 | Go to gptweb.com and click 'Start Free Trial' | Creates your live GPTWeb site instantly — no credit card needed, no waiting | gptweb.com → Start Free Trial button |
| 2 | Fill in your name, email, and company name | Your email becomes your admin login credential — use your real work email | Trial signup form on gptweb.com |
| 3 | Check your inbox and click 'Set Your Password' | Activates your account and sets your admin password (10+ characters recommended) | Email inbox → Set Your Password link |
| 4 | Visit your live site at gptweb.com/site/your-company | Confirms your public-facing conversational site is already live and accessible | gptweb.com/site/your-company-slug |
| 5 | Open the Admin Panel with Cmd+Ctrl+A (Mac) or Ctrl+Alt+A (Windows) | This is the control center for everything — all configuration lives here | Keyboard shortcut on your live GPTWeb site |
Phase 2: Connect Your AI Engine (5 minutes)
| # | Step | Why | Where |
|---|---|---|---|
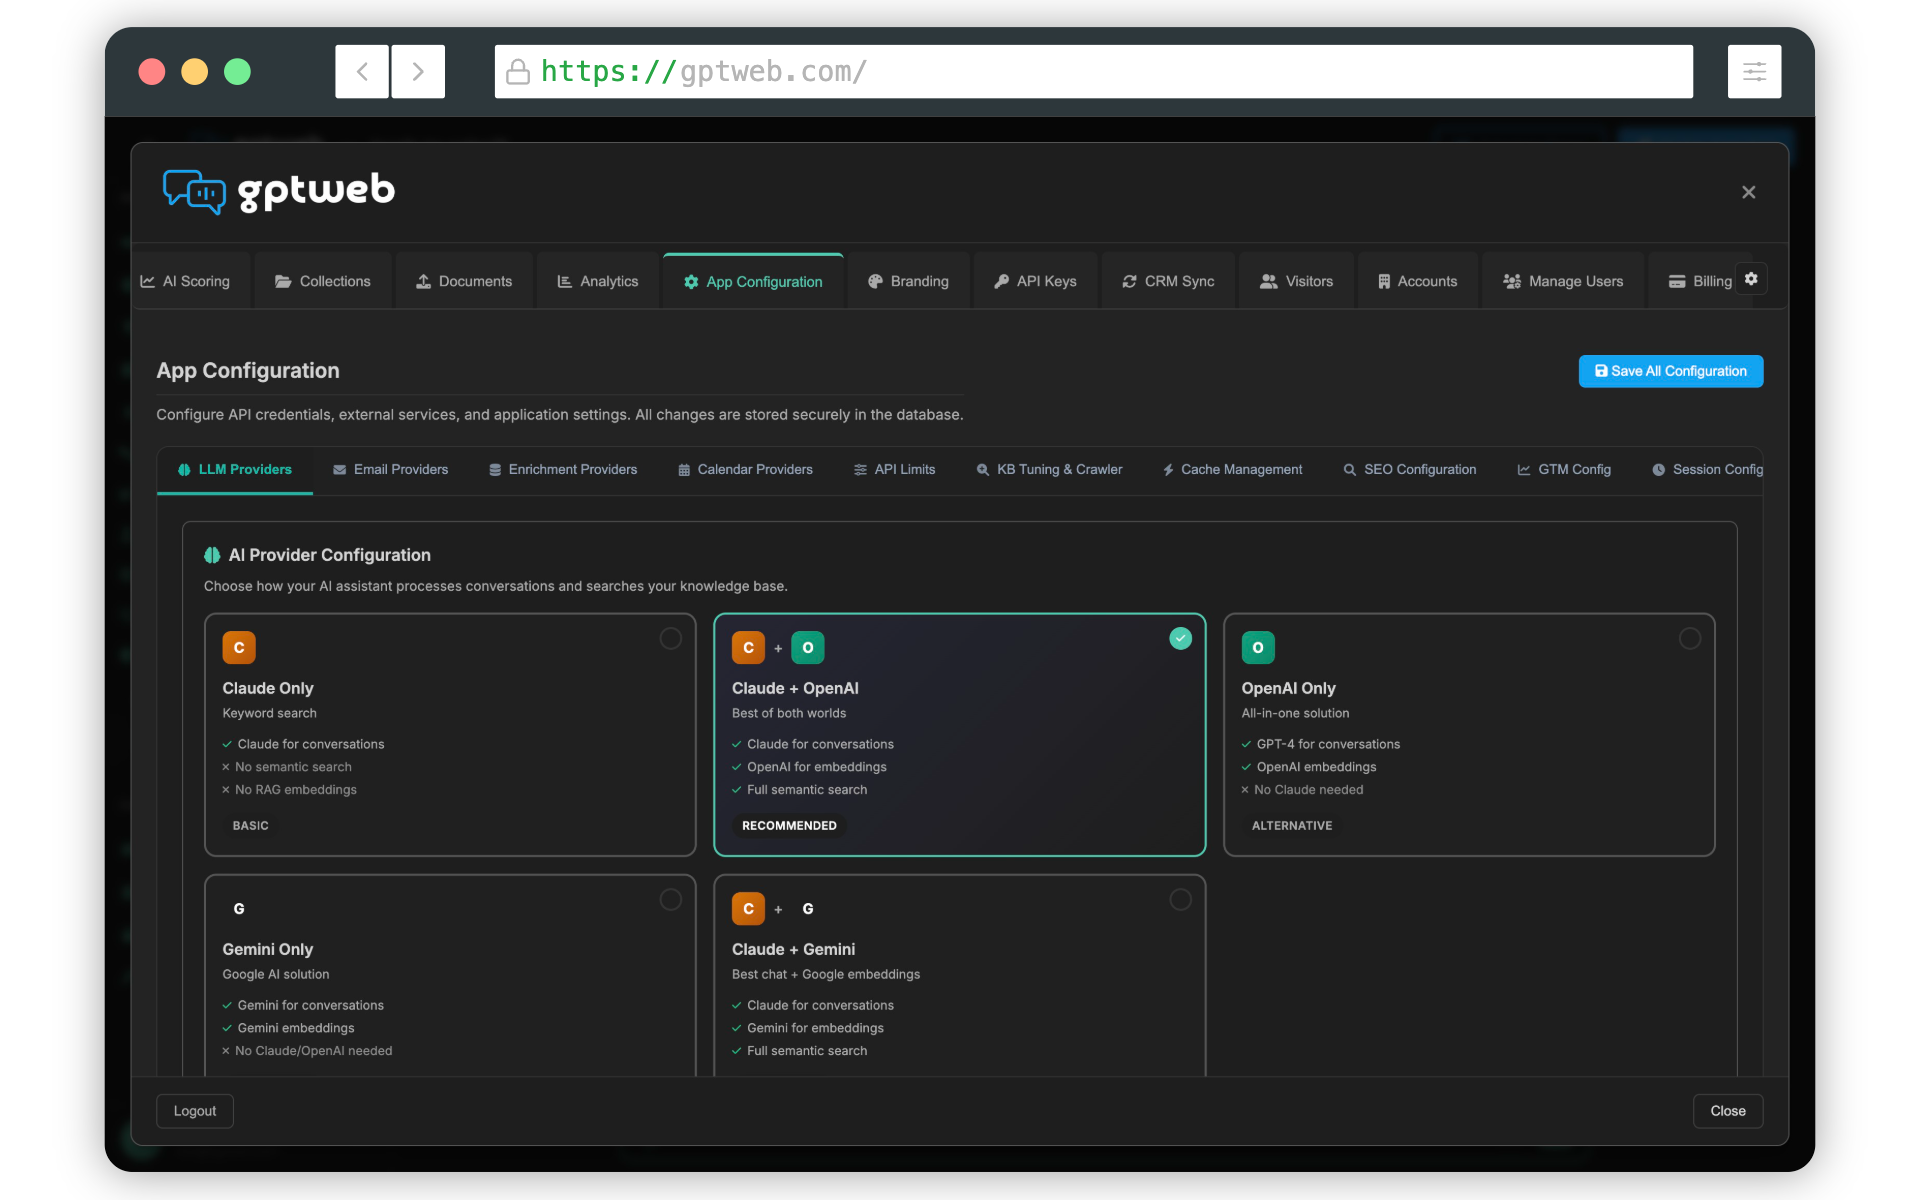
| 6 | Go to App Configuration tab in Admin Panel | This is where you wire up your AI providers — nothing works without this step | Admin Panel → App Configuration tab |
| 7 | Select 'Claude for chat + OpenAI for embeddings' (recommended combo) | Claude handles conversation quality; OpenAI handles semantic search — best of both | App Configuration → LLM Provider selector |
| 8 | Paste your Anthropic API key (starts with sk-ant-) and select Claude Sonnet 4.5 | This is your chat engine — powers every AI response your visitors receive | App Configuration → Claude section → API Key field |
| 9 | Paste your OpenAI API key and select an embeddings model | Embeddings power semantic search across your knowledge base documents | App Configuration → OpenAI section → Embeddings API Key field |
| 10 | Click 'Test Connection' for each provider and confirm green checkmarks | Verifies both connections are live before you proceed — avoid silent failures | App Configuration → Test Connection button (each provider) |
| 11 | Click Save Changes | Nothing persists until saved — always save before navigating away | App Configuration → Save Changes button |
Phase 3: Give Your AI a Personality (10 minutes)
| # | Step | Why | Where |
|---|---|---|---|
| 12 | Go to LLM Instructions tab in Admin Panel | This is where you teach your AI who it is and how to represent {{visitor.company}} | Admin Panel → LLM Instructions tab |
| 13 | Write your core identity: 'You are a helpful AI assistant for [Company], a [what you do]' | Without instructions, your AI is generic — this makes it yours | LLM Instructions → main text area |
| 14 | Add knowledge base boundaries (what topics to stay focused on) | Keeps your AI on-brand and prevents off-topic or embarrassing responses | LLM Instructions → add topic boundary rules |
| 15 | Add tone guidance (conversational, professional, friendly, technical) | Tone consistency builds visitor trust and reflects your brand voice | LLM Instructions → personality/tone section |
| 16 | Click Save Changes | Instructions are applied to every subsequent AI conversation in real time | LLM Instructions → Save Changes button |
Phase 4: Upload Your First Knowledge Document (10 minutes)
| # | Step | Why | Where |
|---|---|---|---|
| 17 | Go to the Collections tab in Admin Panel | Collections are semantic containers that organize your content for accurate AI retrieval | Admin Panel → Collections tab |
| 18 | Click 'Create New Collection' and give it a clear name (e.g. 'Product Knowledge') | A well-named collection helps semantic routing find the right content for each question | Collections tab → Create New Collection button |
| 19 | Write a detailed description of what this collection contains | GPTWeb uses this description for semantic routing — more specific = more accurate AI answers | Collections tab → Collection Description field |
| 20 | Go to the Documents tab and select your new collection from the dropdown | Documents must be assigned to a collection to be searchable by your AI | Admin Panel → Documents tab → Collection selector |
| 21 | Click 'Upload Document' and upload a PDF, DOCX, TXT, or Markdown file | This becomes your AI's first knowledge source — try a product FAQ, overview, or company info | Documents tab → Upload Document button |
| 22 | Wait for processing (GPTWeb auto-chunks into ~1500 char segments with vector embeddings) | Chunking + embeddings enable semantic search — AI finds meaning, not just keywords | Documents tab → processing status indicator |
Phase 5: Your First AI Response (5 minutes)
| # | Step | Why | Where |
|---|---|---|---|
| 23 | Navigate to your live site at gptweb.com/site/your-company | This is where visitors interact — test it exactly as they will experience it | gptweb.com/site/your-company-slug |
| 24 | Type a question about your uploaded document content into the chat | The real test — your AI should answer from your document, not generic training data | Live site chat interface |
| 25 | Observe the response — it should reference your specific content contextually | If it answers correctly, your RAG pipeline is working end-to-end — that's your aha moment | Live site chat response |
| 26 | Try a few more questions — including ones that are close but not exact matches | Semantic search finds meaning, not keywords — test how intelligently it interprets intent | Live site chat interface |
Phase 6: Quick Personalization (5 minutes)
| # | Step | Why | Where |
|---|---|---|---|
| 27 | Go to Welcome Message tab and update the title and greeting text | First impression for every visitor — make it warm, clear, and inviting | Admin Panel → Welcome Message tab |
| 28 | Go to Branding tab and upload your logo and set your 6 brand colors | The 6-color Quick Setup auto-generates all UI colors for both light and dark themes | Admin Panel → Branding tab → Customize sub-tab |
| 29 | Add 2-3 Prompt Library entries with suggested visitor questions | Guides visitors on what to ask — reduces friction and increases first engagement | Admin Panel → Prompt Library tab → Add New Prompt |
| 30 | Click Save Changes on each tab before moving on | All changes require saving — unsaved changes are lost on navigation | Each admin tab → Save Changes button |
~30 Min
Time to First AI Response
30
Total Core Setup Steps
3
LLM Providers Supported
PDF, DOCX, TXT, MD, CSV
Doc Formats Supported
Once you have your first AI response working, the next natural steps are AI Scoring to qualify visitors automatically, AI Segmentation to group them by intent, Agentic Workflow to automate actions, and CRM Sync to push DQLs™ directly into HubSpot or Salesforce. Questions? Reach us at sales@gptweb.com. GPTWeb is the future of engagement: websites and marketing automation combined, built for the AI era, built for now.